Desecrated Cistern – Blasphemous Guide
After defeating Ten Piedad make your way into the Desecrated Cistern area. Here you will run into Deogracias. He will commend you on completing on of the three Humiliations. After you speak with him hit up the Prie Dieu then begin exploring the Desecrated Cistern.
Note: In certain rooms of this area there is toxic gas. Equip the Rosary Bead: Moss Preserved in Glass to traverse some of these rooms.
Desecrated Cistern Map
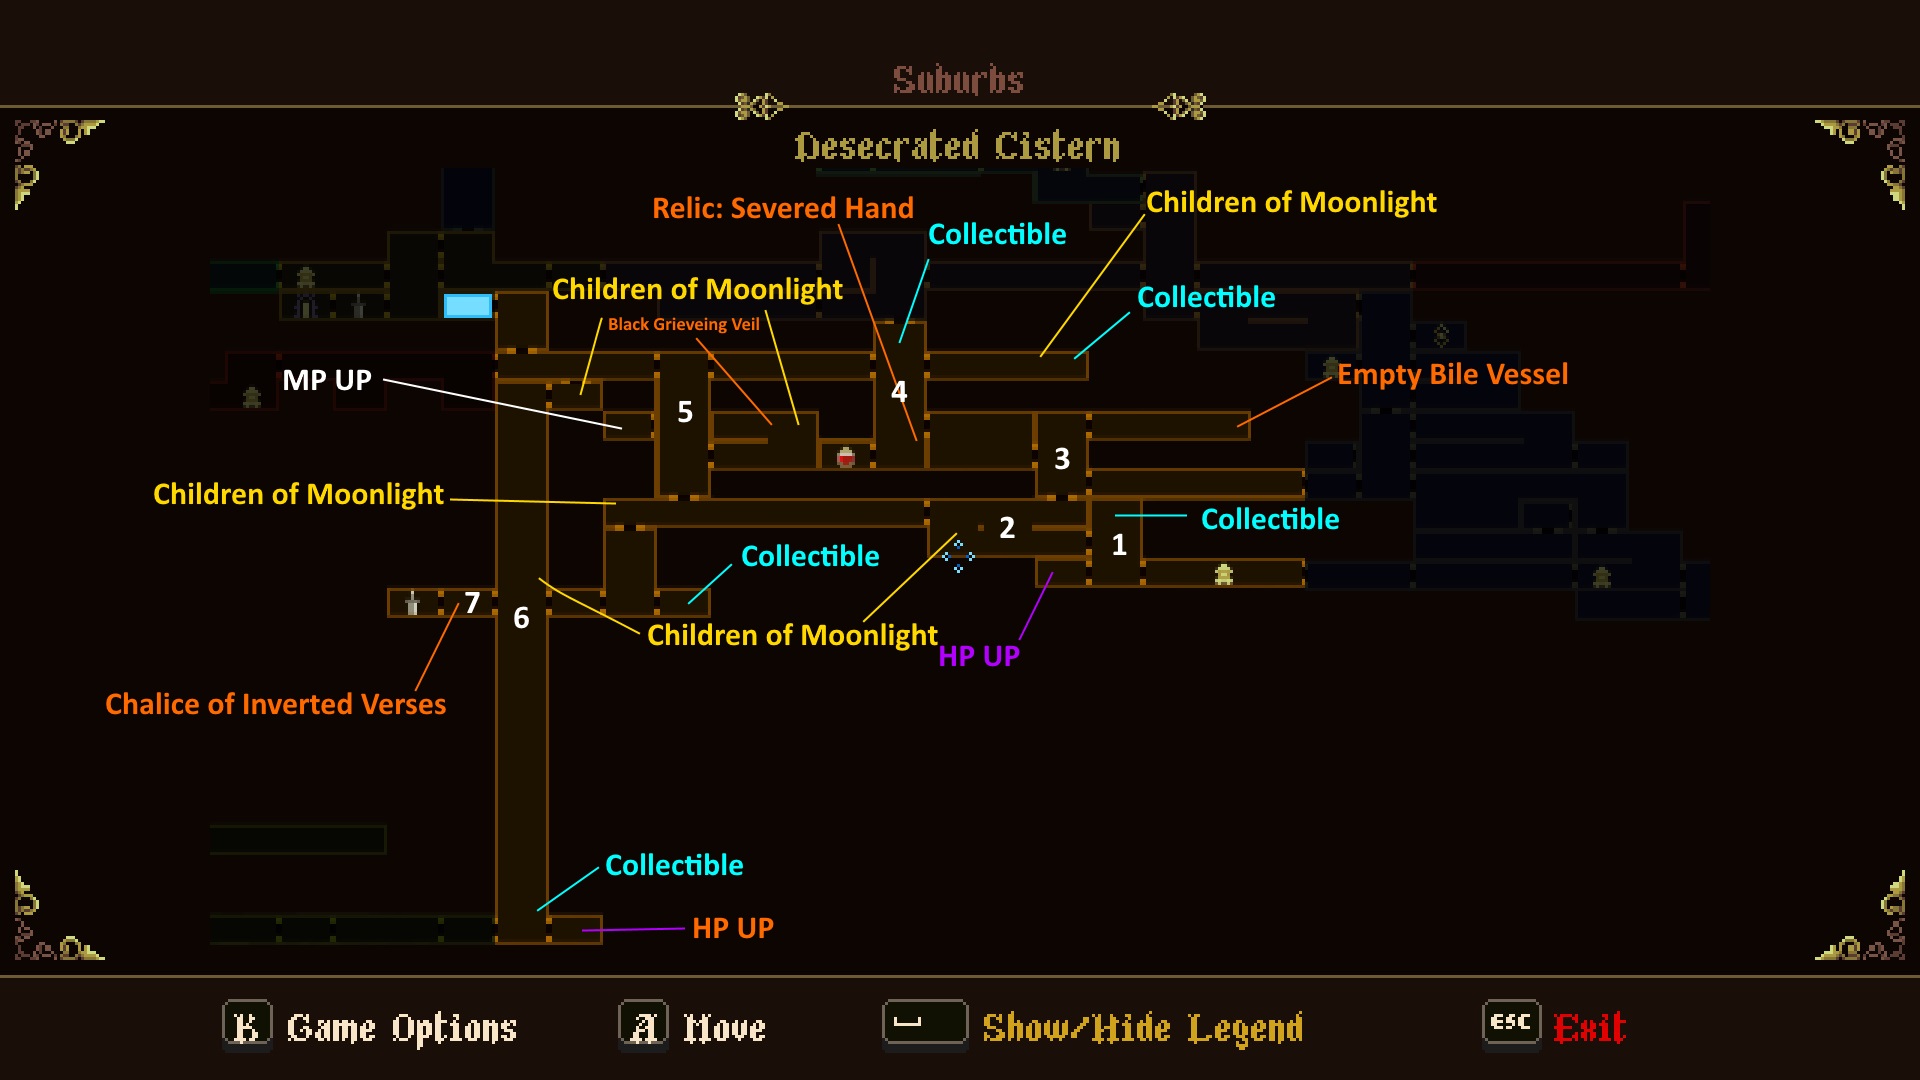
The Desecrated Cistern is a much larger map then we’ve previously experienced up to this point. Since that’s the case it is easy to get lost while moving through this area. Keep that in mind. Check the map above to learn where stuff is and where you should be going.
Room 1
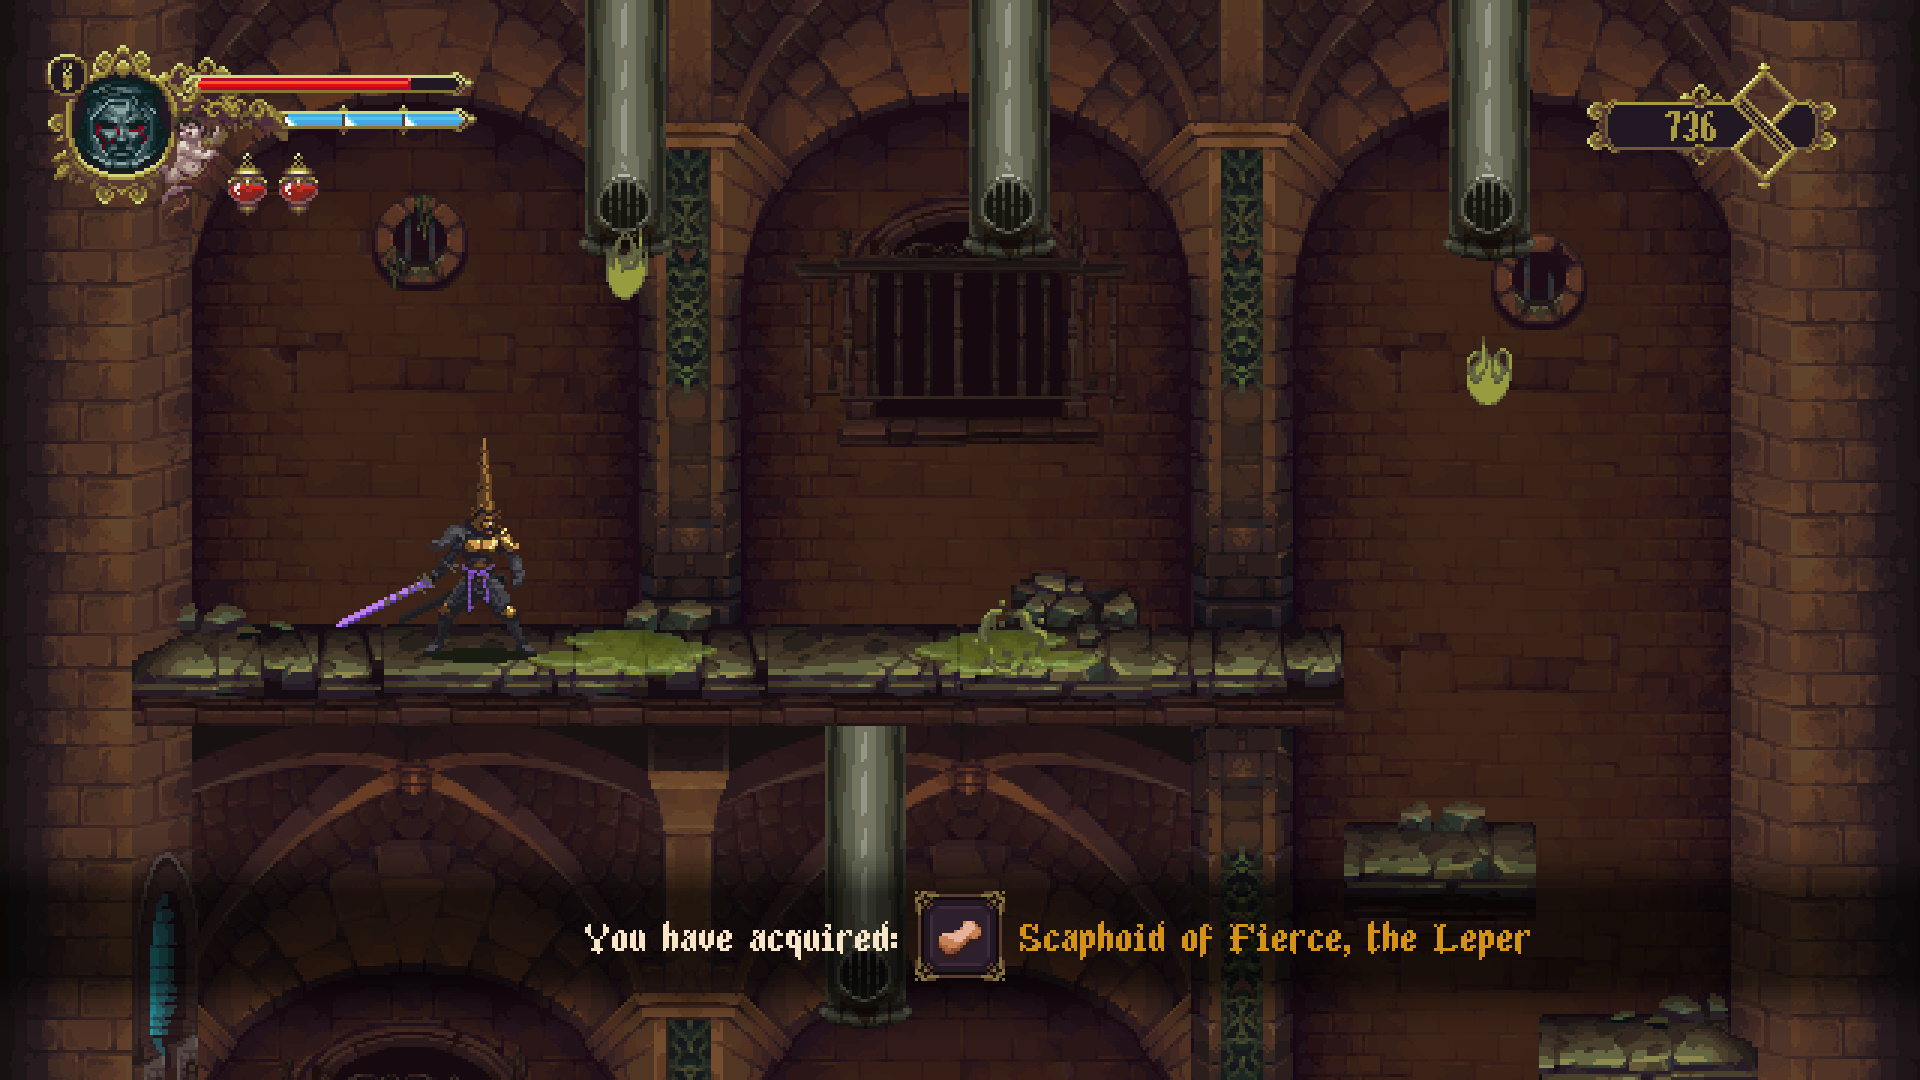
Leave the Prie Dieu to the left and head into the next room. In this room head inside the room on the left to reach an NPC that will raise your Max Health. Return to the previous room and go up. Climb the platforms up the right side of the room to reach the item Collectible – Scaphoid of Fierce, the Leper. Head back down and through into the room on the left.
Room 2

In this next room make your way to the left until your see a Children of Moonlight (5/38). Simply jump up and slash to collect. Continue heading to the left and head up the ladder. Ignore the room (will return here later) to the left for now and jump across the platforms to reach another ladder heading up into the next room.
Room 3

Inside this room head into the first room on your right. Make your way to the very end and pull the lever. Continue heading right into the next room. This creates a shortcut back to Mercy Dreams next to the merchant. Return to the room prior to the switch room and head up. Ignore the room on the left for now and continue up to the room on the right. Inside this room use the Relic: Blood Perpetuated in Sand to reach the Quest Item: Empty Bile Vessel. Return to the previous room and enter the room on the left.
Room 4

Make your way through this room using the platforms along the right side to the ledges above. Cross them to the left to reach an exit. Take it into the next room. In this room you can go a bunch of directions. To start climb the ladder after the poison drip drops to reach a ledge area with shield boi on it. Ignore the two ladders together for now. Instead equip your Relic: Blood Perpetuated in Sand and head towards the top left exit. You will see some blood platforms appear. Follow them up to reach a Collectible: Humerus of McMittens, the Nurse. Continue up to unlock a shortcut back to Wasteland of the Buried Churches. Return to Room 4.
Before leaving Room 4 drop down to the bottom left and enter the room here. There is a blood fountain in this room. Use it to refill your Blood Vials if you have the TOA. This will add another to use (bringing it to 3x). Return to the door on the left and exit through it.
Room 5

Make you way to the left through the long corridor into Room 5. In Room 5 you can go left, down, or middle right. Ignore going down and go into the middle right room. Inside this room you need to make your way over to the switch in the top right corner using the ladders. Turn the switch then cross the room to the top left to get the Quest Item: Black Grieving Veil. You can also grab the Children of Moonlight (6/38) floating around in this room. Return to Room 5 and exit through the left door.
Open the gate and head all the way back to Albero. Touch the Prie Dieu then head back to the tower in the Wasteland of Buried Churches and enter Where the Olive Trees Wither.
Room 6: Grievance Ascends Entrance

Note: The following portion of this guide highlights the Desecrated Cistern area after you complete the Grievance Ascends area.
Once you complete the boss fight in the Grievance Ascends area you will enter a new portion of the Desecrated Cistern. In the first room pull the lever to trigger the elevator. Walk across into the right room and get the Max HP UP. Ride the elevator up and exit into the room on the right. Pull the lever to trigger the ladder. Head up the Albero and make your way to The Bridge of the Three Cavalries.
Later: Return with Nail Uprooted from Dirt
Complete Redento’s side quest to receive the Relic: Nail Uprooted from Dirt. This relic allows us to jump in water which is necessary to explore a couple of area in the Desecrated Cistern.
Room 4

The first area we will explore is in Room 4. Go the very bottom of the room and you will see an item on a ledge to the right. This item is unobtainable without the relic. Jump to it to receive the Quest Item: Severed Hand. This item can be taken to the woman in the Dream area in Albero.
You can also enter the room in the top right of Room 4 and reach the Chest there now. Inside the chest is Prayer: Zambra to the Resplendent Crown. Grab the Children of Moonlight that is floating here as well.
Room 2
The next area we will explore is in Room 2. Head inside the left room I told you to previously ignore. With the relic we can make the jumps in this room. This lead us to a lever which opens the two gates. Open the gates and continue heading to the left. Before the ladder here there is a Children of Moonlight you can grab. Go down the ladder into the next room.
Room 7
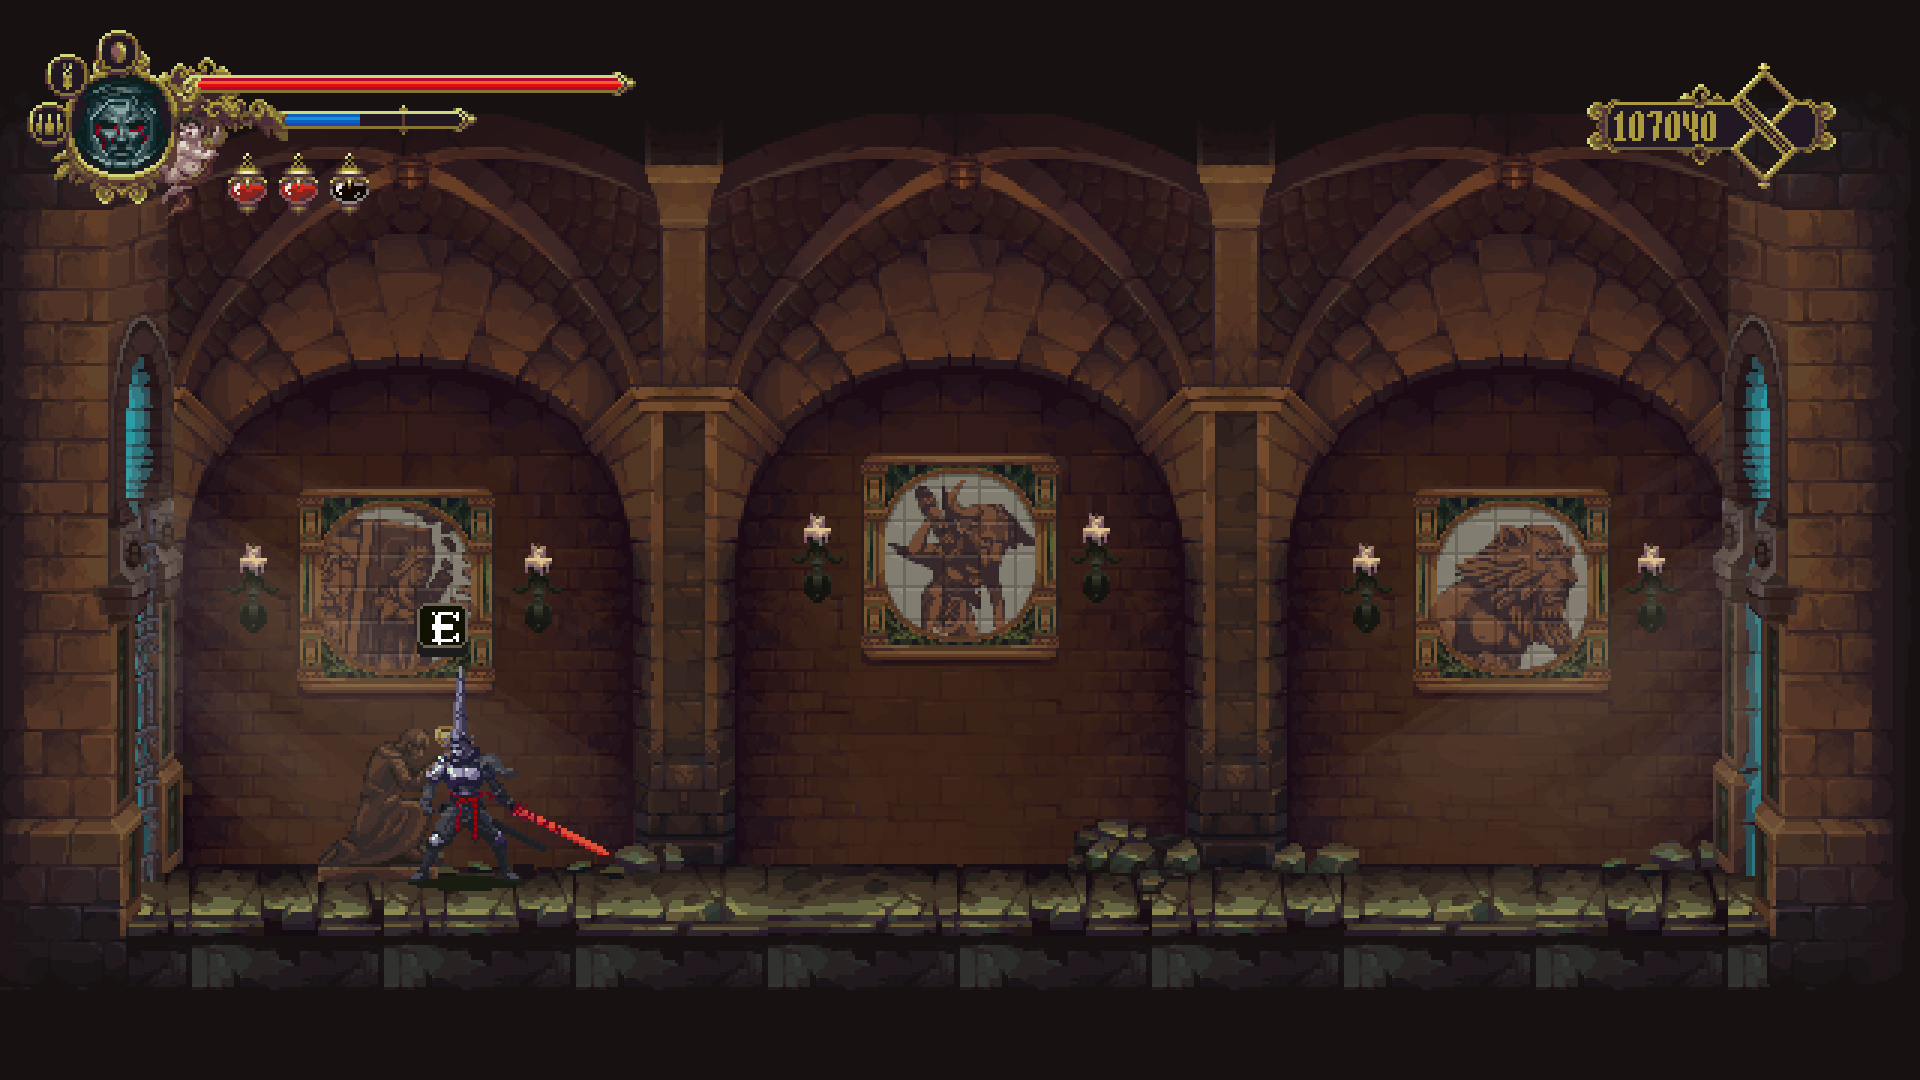
In this room head to the exit on the bottom right and jump up the ledge to reach Collectible: Hyoid bone of Senex, the Beggar. Return to the previous room and head through the left exit. Hit the gate switch here and equip your Relic: Three Gnarled Tongues to cross the elevator shaft. Interact with the statue in this room to get the Quest Item: Chalice of Inverted Verses.
Take this Quest Item: Chalice of Inverted Verses and defeat the three enemy types pictured in the paintings above the statue. The caveat being you can’t Fast Travel or die. Tip start with the Stone Casket Bearer first.
- Stone Casket Bearer: The
- Spear Thrower: Mountains of Endless Dusk.
- Lion Jailer: Hall of Prohibitions.
.Once you’ve done filled the Chalice return it to the statue unlock a Mea Culpa Shrine.
Para abrir la puerta cerrada, hace con el mecanismo del ascensor arriba, abajo, arriba, abajo y luego sube para conseguir la cuenta calcinada de quirce
En la muralla de las santas prohibiciones
The lion is in the Wall of The Holy Prohibitions.
You miss a room here, I want to contribute:
See picture.
https://imgur.com/jxjKuqC
It is across room 7 to the right, next to elevator shaft 6.
There are 2 empty canvas in this room, where number change after you go through a door way.
The left canvas with dead body say: “Everyone pass”. Go and return from the left door way until it reach IV (which is the highest possible number) on the left canvas.
On the right canvas with dead body says: “Half do not return”. So you go to right door way and return until it reaches II. The secret door should be revealed
Stone Casket Bearer: The
The what?
The Stone Casket Bearer is located at The Sleeping Canvases, in a room with some gold enemies.
Hi, i can’t find the “Lion Jailer”, can you update the position of this monster?
And the “Stone Casket Bearer” is on The Sleeping Canvases.
Following an order for this quest is not necessary.
Good day. !