Control The Face of the Enemy Guide
In Control, few missions carry the narrative weight and mechanical complexity of “The Face of the Enemy.” This critical chapter not only advances Jesse Faden’s quest to uncover the Bureau’s secrets but also unlocks Level 6 Clearance—a gateway to the Oldest House’s most restricted areas. From confronting Jesse’s enigmatic brother Dylan to navigating surreal dimensions like Ordinary Awe, this The Face of the Enemy guide breaks down every step of this labyrinthine mission, blending tactical advice with lore insights to help you dominate the Hiss and unravel the Bureau’s darkest experiments.
The Setup: Meeting Pope and Confronting Dylan

The mission begins with a summons from Emily Pope, the Bureau’s steadfast researcher. After visiting the P6 Cell (a key story beat), return to the Board Room in Central Executive. Here, Pope delivers a lore-rich briefing about Dylan Faden, Jesse’s brother and a central figure in the Bureau’s shadowy Prime Candidate Program.
Key Steps:
- Central Executive: Head upstairs to Dylan’s secured office, guarded by two agents.
- Cutscene Revelations: Interact with Dylan’s suspended form to trigger a haunting cutscene. His cryptic dialogue hints at the Bureau’s failures and grants Jesse the Level 6 Key Card, unlocking access to the Prime Candidate Program.
Journey to the Prime Candidate Program
With Level 6 Clearance, Jesse ventures into the heart of the Bureau’s most clandestine projects.
- Logistics to Security: Fast-travel to the Logistics Control Point, then navigate through the Medical Bay into Security. Follow signs to the Prime Candidate Program.
- Level 6 Door: Unlock the restricted entrance, pass through a metal detector, and descend into a sterile, ominous hallway.
The Prime Candidate Program: Offices and Combat

This area blends environmental storytelling with intense combat:
- Pathfinding: Turn left past the locked door, traverse a corridor of abandoned offices, and enter a sprawling room teeming with Hiss soldiers.
- Progression: Clear enemies, drop into a lower level, ascend a ramp, and climb stairs to reach Room P7. Interact with documents here to glean lore about the Bureau’s experiments.
Turntable Puzzle: Aligning the Bridge

The mission’s first major puzzle unfolds in the Turntable, a industrial chamber housing a massive rotating bridge.
- Clear Obstructions: Shoot glowing Hiss spores blocking the bridge’s movement.
- Bridge Operator Room: Located in the northeast corner, this control room lets Jesse activate the bridge via a console.
- Transit Corridor North: Cross the bridge to access the next area.
Hangar Puzzle: Powering the Elevator
In Transit Corridor North, progress is blocked until Jesse solves a gold box puzzle:
- Locate Boxes: Two gold cubes sit in the hangar; a third hides in a southeast side room.
- Insert Cubes: Place all three into wall sockets to activate an elevator in the northeast corner.
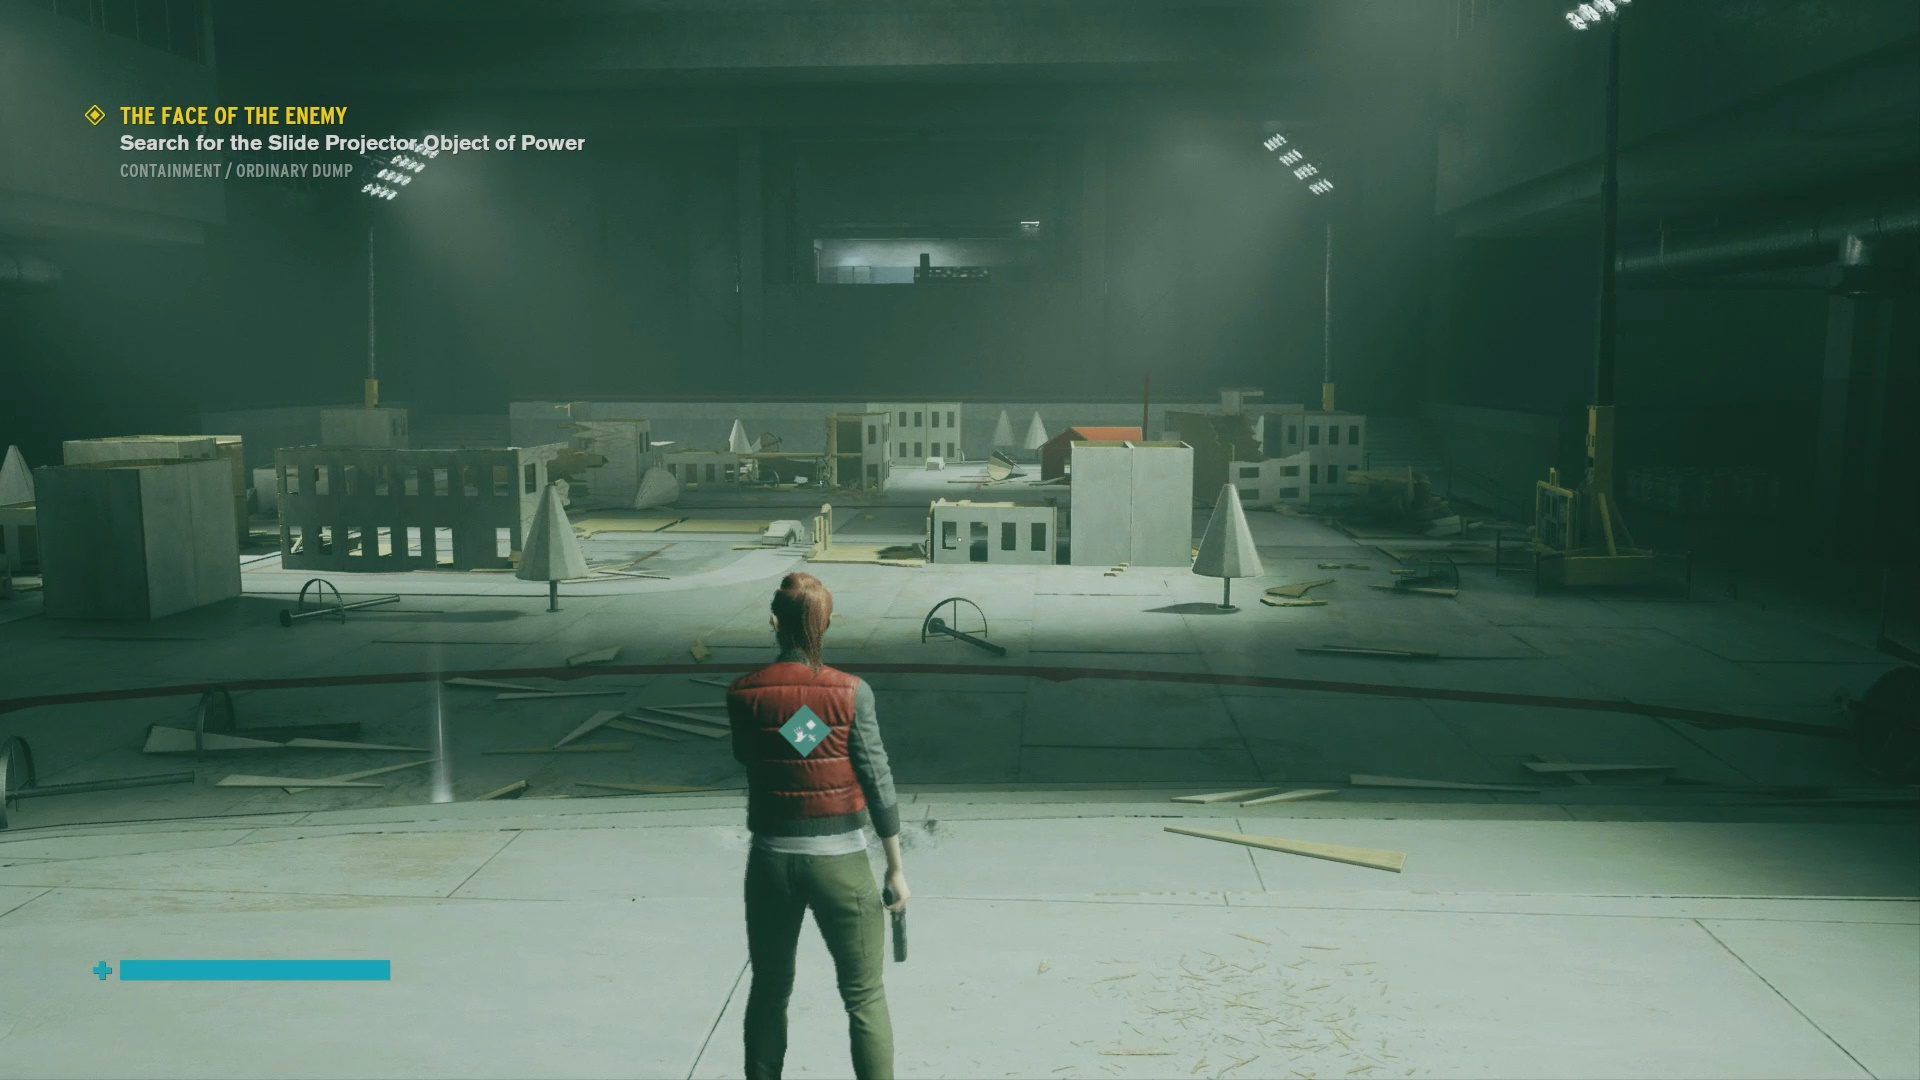
Ordinary Awe: A Nostalgic Nightmare
The elevator leads to Ordinary Awe, a surreal recreation of Jesse’s childhood town.
- Objective: Navigate the eerily familiar streets while fending off Hiss ambushes.
- Twist: Exits seal until all enemies are defeated, forcing players into tense, close-quarters combat.
Ordinary Dump Site: Uncovering Darling’s Secrets

The mission crescendos at the Ordinary Dump Site, a junkyard brimming with Hiss and buried secrets.
- Mobile Lab: Fight through enemies to reach a lab on the south side.
- Darling’s Recording: Interact with the computer to view a video of Dr. Casper Darling, revealing the Projector’s relocation to Dimensional Research.
Mission Rewards and Implications
- Level 6 Clearance: Unlocks high-security doors across the Oldest House.
- Lore Expansion: Deepens the mystery of the Hiss, Dylan’s role, and the Bureau’s dimensional breaches.
- Next Mission: Triggers “Finnish Tango”, advancing Jesse’s confrontation with the Hiss.
Now that you’ve conquered “The Face of the Enemy,” dive deeper into the Oldest House’s secrets with our guides to Self-Reflection, where you’ll solve eerie mirror puzzles and battle your doppelgänger, and A Captive Audience, a quest that pits you against the surreal challenge of a possessed audience.
Did the Ordinary Awe segment unnerve you as much as the Hiss? How did you fare against the Turntable’s challenges? Share your triumphs, theories, or lingering questions in the comments below
I somehow ran into a glitch on this mission which is why I am here on this page, trying to figure out what might fix it – started the mission normally but the security barrier, for whatever reason, was still locked. Maybe because I took a detour to deal with the anchor altered item side quest between the start of the mission and heading into the security area? I can’t think of any other reason why this glitch might have happened.