Mercy Dreams – Blasphemous Guide
Making your way through the Wasteland of Buried Churches will land you in the new area called Mercy Dreams. In this area you will face off against a boss. To learn how to traverse this area check out our Mercy Dreams area guide below.
Mercy Dreams Map
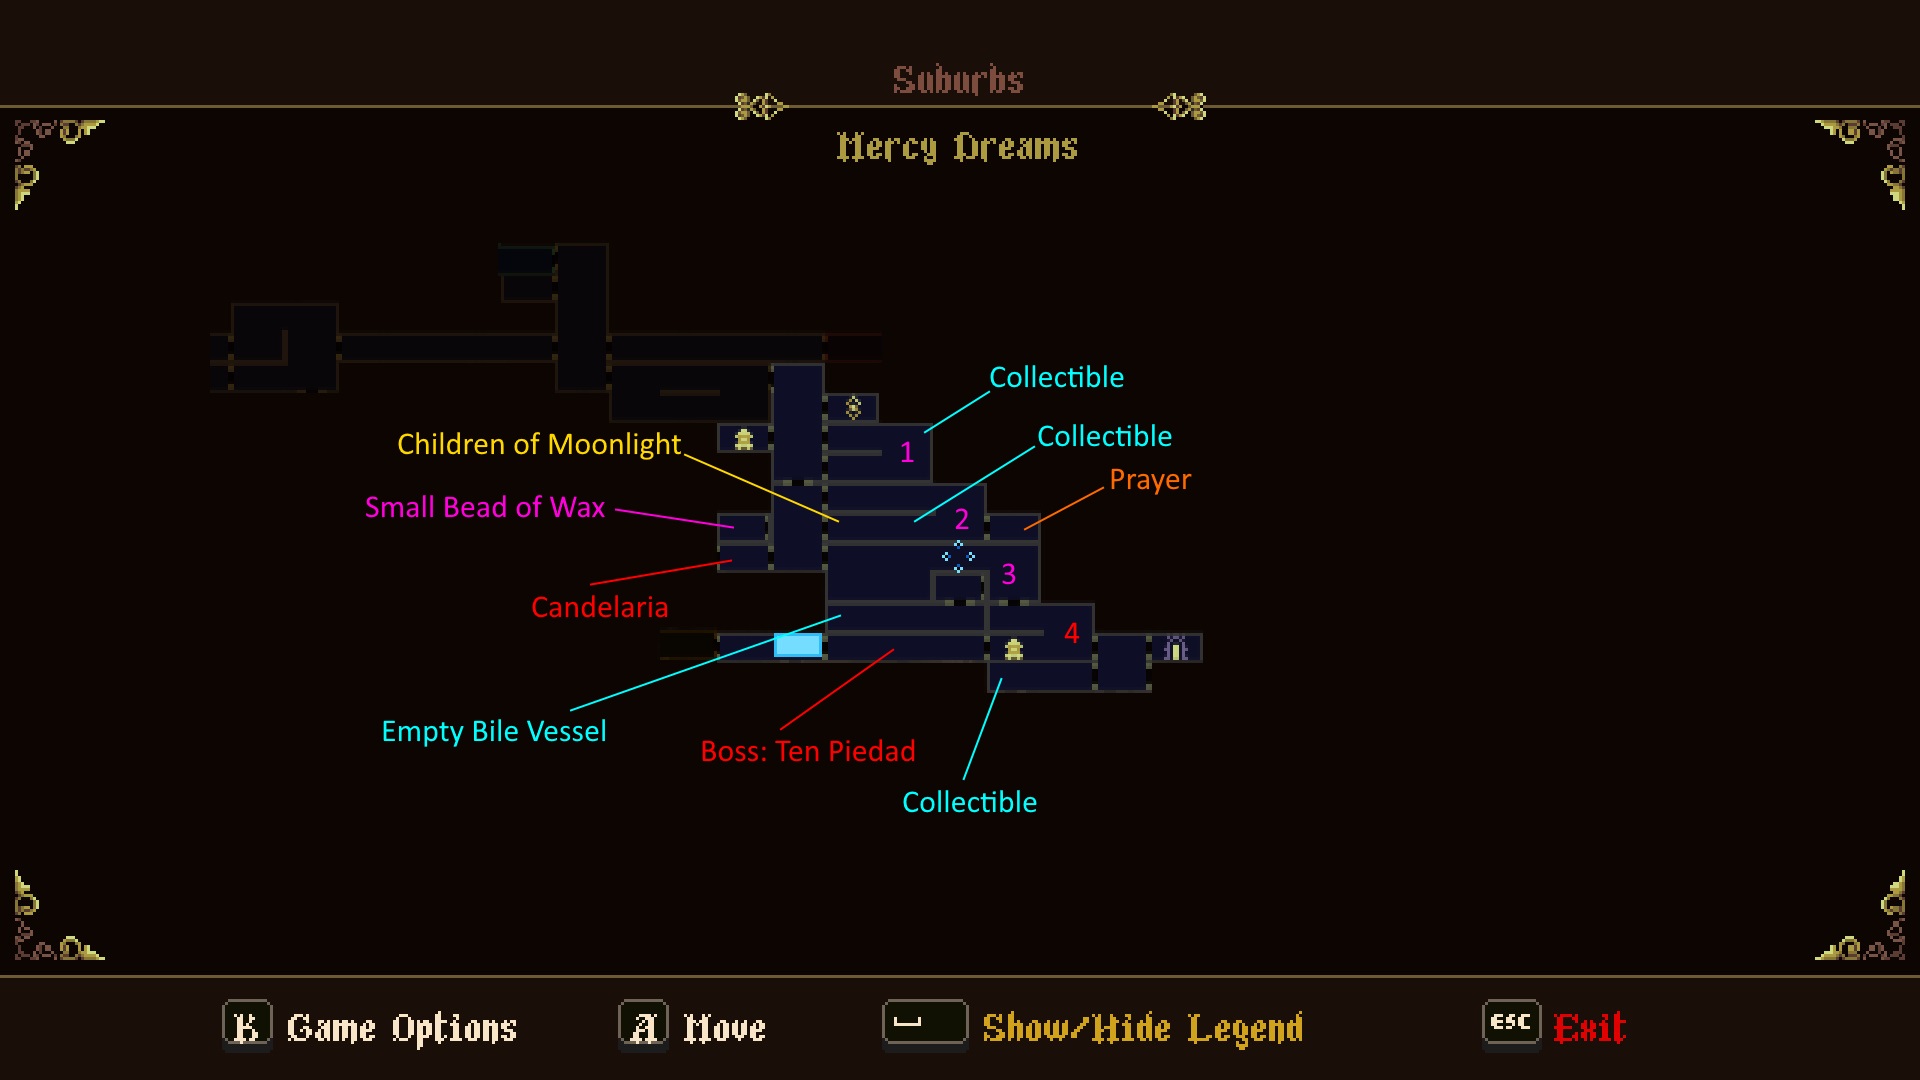
Mercy Dreams is a large area featuring a number of enemies, items, and a boss to fight. To help you traverse this area use the map above to see where everything is located.
Mercy Dreams

When you enter the first tower area of Mercy Dreams you can enter the first room on your right. Inside this room is a statue you can kneel before to remove Guilt. Once you’ve done this make your way back into the tower area and head down. Go inside the room on your left to reach a Prie Dieu. Kneel at it then head out and into the room on your right.
Room 1

Inside this room beware the spike trap on the raised platform by the entrance. Make your way past this trap to reach a new enemy. The Candelabra Wielder has one single attack which is a horizontal dash. This can be dodged easily. Head right towards the Candelabra Wielder and take it down. Continue right past the next spike trap and jump across the gap to the ledge with the ladder. Hit the wall to the right to find a secret. Kill the enemy guarding the item then grab the Collectible – Maxilla of Tarradax, the Cleric. Head down the ladder and take out the two Candelabra Wielders.
Go down the next ladder after the two Candelabra Wielders and make your way through the corridor of moving spike traps. To get through this corridor unharmed stop in the middle and crouch then proceed left when clear. Take out the three enemies in the next area and continue left and head out the door into the stairway. Jump up and open the shortcut back to the Prie Dieu room. Head down the stairs. Take the ladder down and enter the room to the right.
Room 2

Inside this room you will see spike traps by the entrance. Avoid them and head right towards the enemies. There is a new enemy here that shoots projectiles along with a Candelabra Wielder. Take out the enemies and continue right past the projectile trap. Keep going until you reach a ladder down. Take the ladder down to the floor below. Head into the room on the bottom right and open the chest to get the Prayer – Seguiriya to you Eyes like Stars. As soon as you get this item 4x projectile enemies will appear. Take them out and return to the previous room.

Head left along the bottom of this room until you reach a new enemy type which is a Cardinal sitting in a floating chair. Take out the Cardinal and Flail Wielder then head left. Go up the ladder and jump to the platform with the Candelabra Wielder on it. Head right to reach the Collectible – Cervical vertebra of Zicher, the Brewmaster. Make your way back across the platforms and drop down to the door on the left. Hit the floating Children of Moonlight (4/38) to collect it. Exit into the staircase.

In the stairway jump up and open the shortcut. Drop back down and head left. Don’t go down the ladder yet, instead jump to the wood platform to the left. Hit the wall to reveal a hidden room. Inside this hidden room is Rosary Bead – Small Bead of Wax. Grab it and return to the previous room. Go down the ladder and head into the room on the left.
Candelaria – Merchant

Inside this room you will see a blue crack in the wall and a locked gate. Ignore the gate for now and enter the blue crack. Through this blue crack you will meet the merchant named Candelaria. Candelaria sells a few items for Tears of Atonement:
- Key to the Chamber of the Eldest Brother (400): Opens locked door in Brotherhood of the Silent Sorrow.
- Hollow Pearl (1000): Creates fervour when destroying surrounding objects.
- Moss Preserved in Glass (1500): Grants some protection against toxins.
From this merchant you should pick up the Key to the Chamber of the Eldest Brother and the Moss Preserved in Glass. They will come in handy for the next area.
Room 3

The beginning of this room features a number of traps you need to avoid. These traps include spike and projectile. Make your way past the traps in the first half of the room and you will reach an area with traps and enemies. Continue heading right through all the enemies and you will come down the right side of the room. After the two Flail Wielders on the wooden platforms go down the ladder and hit the wall on the left to reveal a secret area. Don’t go there yet. Instead head down the ladder on the right into the next room (purely for the Prie Dieu there).
Secret Area: Go down the ladder into the secret room. Inside this room there are a number of enemies. At the end of the room there is a challenge room with 2x Candelabra Wielders and a Bishop. Take them out to gain access to the Quest Item – Empty Bile Vessel.
Room 4

Head down the stairs in this room then jump across to the NPC named Viridiana. Speak to her and she will ask you if you want help with the boss (Assent/Dissent). If you assent Viridiana will disappear and will appear in the boss arena when you fight . Regardless of your choice head from Viridiana and make your way down to the kneel at the Prie Dieu below. To the left of this Prie Dieu is the boss fight. Don’t go there yet. Instead go into the room on the right.
The room to the right is a fast travel room. Ignore it and head down the ladder in this room and go into the room on the left. Inside this room you need to dodge and jump your way over to the left side to reach the Collectible – Pisiform of Hernandez, the Explorer. Return to the Prie Dieu. Boss time!
Boss: Ten Piedad

Ten Piedad is a boss you will encounter in the Mercy Tears area Blasphemous. This boss is a sort of part hound/part tree hybrid creature. During the fight Ten Piedad has a few attacks it will use:
- Swipe: will kneel then swipe once at you. Dodge and stay close to the body to get in some nice damage after the swipe.
- Ground Smash (Fists): Turns towards screen and windows up armors over head before smashing fists into ground. Shoots out roots from the pound (3x roots on both sides in first phase; 5x roots on both sides in second phase). Easily avoided if you run to the edges of the arena when Ten Piedad is winding up.
- Ground Smash (One Leg): Basically does a one leg ground smash that looks like a lunge. Deals damage if hit and also sends out roots that appear around where the player is. (2 roots in first phase; 3 roots in second phase). Easy to dodge this to the opposite side of Ten Piedad’s body.
- Root Bomb (Projectile): Shoots out a root bomb that will deal damage to you on hit or leaves behind a root you can run into if not hit.
Once you defeat Ten Piedad you will earn the No Mercy achievement and 625 TOA. Head to the room on the left and you will kneel in the circle before the body there. This will take you to a new dream area.
Desert/Sea Area

In the desert area walk all the to the right until you reach a floating skull. This will trigger a cutscene. After the cutscene you will receive the Quest Item: Holy Wound of Attrition. You will then leave the dream and return to the room with the body. Head left to reach the Desecrated Cistern. Before doing anything go get the Relic: Blood Perpetuated in Sand.