



Red Dead Redemption 2 features one of the most detailed and rewarding weapon systems in any open-world game. Weapons wear down and need maintenance, but you can upgrade their performance and look. This guide covers everything — weapon categories and the best gun in each, all ammo types explained, unique and missable weapons, Gun Oil, customization, and every Gunsmith location in story mode.
1. Gunsmith Locations

Look for the pistol icon on your map to locate Gunsmiths in most major towns. Every Gunsmith buys, sells, cleans, and customizes weapons, though their available stock changes based on location and story progress.
| Town | Region | Available From | Notes |
|---|---|---|---|
| Valentine | New Hanover | Chapter 2 | First accessible Gunsmith; closest to early camp |
| Strawberry | West Elizabeth | Chapter 2 | Limited access early in the story |
| Rhodes | Lemoyne | Chapter 3 | Good mid-game option; stocks repeaters and rifles |
| Saint Denis | Lemoyne | Chapter 3+ | Best-stocked Gunsmith; exclusive weapons available |
| Annesburg | Roanoke Ridge | Chapter 4+ | Useful for northern map exploration |
| Blackwater | West Elizabeth | Epilogue | Full stock available in epilogue |
| Tumbleweed | New Austin | Epilogue | Full stock available in epilogue |
Early Game Tip: Valentine is the first and most convenient Gunsmith in Chapter 2. It’s close to Horseshoe Overlook camp and stocks Gun Oil, basic ammo, and most entry-level weapons. Make it a regular stop early on.
2. Weapon Categories Overview
RDR2 story mode features over 50 weapons divided across several categories. Each category fills a different role in combat, and building a balanced loadout across two or three of them will serve you better than specializing in just one.
| Category | Best Range | Primary Use |
|---|---|---|
| Revolvers | Close–Mid | Reliable all-rounder sidearm; great in Dead Eye |
| Pistols | Close–Mid | Higher fire rate than revolvers; dual-wield option |
| Repeaters | Mid | Backbone of most loadouts; high ammo capacity |
| Rifles | Long | Sniping and long-range precision; high damage |
| Shotguns | Close | Devastating at close range; indoor combat |
| Bow | Mid | Silent; essential for hunting perfect pelts |
| Thrown (Dynamite, Molotovs, Knives) | Short–Mid | Crowd control and situational use |
| Melee | Melee only | Close quarters; stealth takedowns |
3. Revolvers — Best Picks
Revolvers are the classic Wild West sidearm — slower to fire than pistols but hard-hitting and satisfying to use. They excel in Dead Eye sequences and are a reliable choice throughout the entire game.
Best Revolver: Schofield Revolver
The Schofield is the best all-around revolver in the game and the one most players should default to. It has excellent damage, strong accuracy, and a fast reload for its category — making it effective from Chapter 2 right through to the end of the story. It can be purchased from any Gunsmith from Chapter 2 onwards, or stolen for free from the Rhodes Gunsmith during a side activity.
Other Notable Revolvers
- Double-Action Revolver — fastest fire rate of all revolvers; weaker per shot but effective when dual-wielded. Available from Chapter 2.
- LeMat Revolver — unique 9-round cylinder plus a single-shot shotgun barrel underneath. One of the most versatile weapons in the game. Available from Chapter 4 in Saint Denis.
- Cattleman Revolver — the starting revolver; solid but outclassed quickly. Good for fully upgrading early to earn the Locked and Loaded achievement cheaply.
4. Pistols — Best Picks
Pistols prioritize fire rate and ammo capacity over raw stopping power. They come into their own when dual-wielded or when dealing with multiple enemies at close range.
Best Pistol: Schofield Revolver (early) / Semi-Automatic Pistol (late)
For most of the game, the Volcanic Pistol is the standout choice in this category — it has the highest damage of all pistols and holds 8 rounds. Available from Valentine’s Gunsmith from Chapter 2. In the later chapters, the Semi-Automatic Pistol becomes available and offers a far higher fire rate, making it exceptional when you need to put down a lot of enemies quickly.
Other Notable Pistols
- Volcanic Pistol — highest damage among pistols; best paired with a second weapon when dual-wielding. Available Chapter 2.
- Mauser Pistol — high fire rate and 10-round capacity; available Chapter 5 (or earlier via the unique Midnight’s Pistol — see Unique Weapons below).
- Semi-Automatic Pistol — available Chapter 4; best overall pistol in the late game for sheer volume of fire.
5. Repeaters — Best Picks
Repeaters are the workhorses of your loadout. They occupy the mid-range gap between sidearms and rifles, with good damage, high ammo capacity, and versatility that makes them your most-used weapon in the majority of story missions.
Best Repeater: Lancaster Repeater
The Lancaster Repeater is the best all-around repeater in the game and the one most players should prioritize upgrading. It offers excellent accuracy, a fast fire rate, and an 8-round capacity. Critically, its accuracy bloom (how much the reticle expands after each shot) is tighter than any of its competitors, making follow-up shots and headshot chains more reliable. It’s available from Gunsmiths from Chapter 2.
Other Notable Repeaters
- Litchfield Repeater — higher damage than the Lancaster but noticeably worse accuracy bloom; a fair trade-off if you prefer power over precision. Available Chapter 3.
- Evans Repeater — 26-round magazine, the largest of any repeater; excellent for sustained fire. Available Chapter 4 in Saint Denis.
- Carbine Repeater — the earliest repeater available; good starter option but outclassed quickly by the Lancaster.
6. Rifles — Best Picks
Rifles are your long-range tools — high damage and accuracy at the cost of fire rate and reload speed. They’re essential for hunting, sniping during missions, and taking out enemies at distances where repeaters lose effectiveness.
Best Rifles
There are two standout rifles depending on your needs. The Bolt-Action Rifle is the more versatile of the two — solid damage (2.8 out of 4), a 5-round magazine, and a decent fire rate for a rifle. It’s obtained after completing the mission Preaching Forgiveness as He Went in Chapter 3. The Rolling Block Rifle hits harder (3.4 out of 4 damage) and has excellent range and accuracy, but its low fire rate makes it best for single, high-value shots rather than sustained engagements. It’s available from any Gunsmith after Chapter 2’s Pouring Forth Oil mission.
- Bolt-Action Rifle — best all-around rifle; good damage and fire rate. Unlocked Chapter 3.
- Rolling Block Rifle — highest single-shot damage of all rifles; ideal for sniping. Available Chapter 2+.
- Carcano Rifle — fastest fire rate of all rifles; best choice for long-range combat against multiple enemies. Available Chapter 5.
- Springfield Rifle — early-game rifle; solid but outclassed by the Bolt-Action later.
7. Shotguns — Best Picks
Shotguns are close-range specialists. At short distance they’re devastating — one or two shots will down most enemies. They’re essential for indoor gunfights, close ambushes, and any situation where enemies are pushing into your space fast.
Best Shotgun: Pump-Action Shotgun
The Pump-Action Shotgun is the most versatile shotgun in the game — good damage, a 6-round magazine, and a fire rate that lets you take on multiple enemies without reloading. Available from Gunsmiths in Chapter 2. For pure stopping power, the Semi-Auto Shotgun (available Chapter 4) fires even faster and holds more rounds, making it the best choice in the late game.
- Pump-Action Shotgun — best early-to-mid game shotgun; reliable and fast. Available Chapter 2.
- Semi-Auto Shotgun — best late-game shotgun; highest fire rate and capacity. Available Chapter 4.
- Double-Barreled Shotgun — two shots before reload; devastating burst but slow to follow up. Good for ambushes.
- Sawed-Off Shotgun — can be dual-wielded; excellent for close-quarters chaos but very limited range.
8. Bow and Thrown Weapons
The Varmint Rifle and Bow are the two most important weapons for hunting. The Bow is the go-to choice for hunting medium and large animals — it’s silent, preserves pelt quality, and can be loaded with different arrow types for different prey. It’s obtained automatically during the Chapter 1 mission The Aftermath of Genesis and cannot be missed.
Arrow types for the bow include Regular Arrows, Improved Arrows (more damage), Small Game Arrows (for birds and small animals), Poison Arrows (for stealth takedowns), and Fire Arrows (for destruction and panic). Arrow types can be crafted at a campfire or purchased at Gunsmiths and General Stores.
For thrown weapons, Dynamite is the most useful for clearing groups of enemies or blowing train safes. Molotov Cocktails are effective for flushing enemies out of cover. Both can be purchased at Gunsmiths and General Stores.
9. All Ammo Types Explained
RDR2 features multiple ammo types for each weapon category. Choosing the right ammo makes a meaningful difference in combat effectiveness and hunting. All ammo types can be purchased at Gunsmiths and General Stores, and some can be crafted at campfires.
| Ammo Type | Effect | Best Used For |
|---|---|---|
| Regular | Standard damage; no special properties | General use; cheap to stock up on |
| High Velocity | Greater range; can pierce through multiple targets | Groups of enemies; mid-to-long range combat |
| Split Point | Improved damage and accuracy; Dead Eye drains more slowly | Dead Eye sequences; precision combat |
| Express | Higher damage at the cost of accuracy | Close-range combat; stopping power over precision |
| Explosive | Highest possible damage; very limited carry capacity | Legendary Animals (story mode only — safe for pelts); tough enemies |
| Incendiary (Shotgun) | Sets targets on fire on impact | Crowd control; flushing enemies from cover |
| Buckshot (Shotgun) | Standard shotgun spread | General close-range use |
| Slug (Shotgun) | Single projectile; better range and accuracy | Medium-range shotgun use; more precise than buckshot |
Important: Explosive ammo does not damage Legendary Animal pelts in story mode — it’s safe to use and actually recommended since Legendary Pelts cannot be destroyed by any ammo type. Note this does not apply to Red Dead Online, where explosive ammo will destroy pelts.
Split Point Tip: Split Point ammo is craftable at a campfire using regular ammo and is arguably the best all-purpose upgrade. The slower Dead Eye drain alone makes it worth using in almost every combat situation.
10. Unique and Missable Weapons
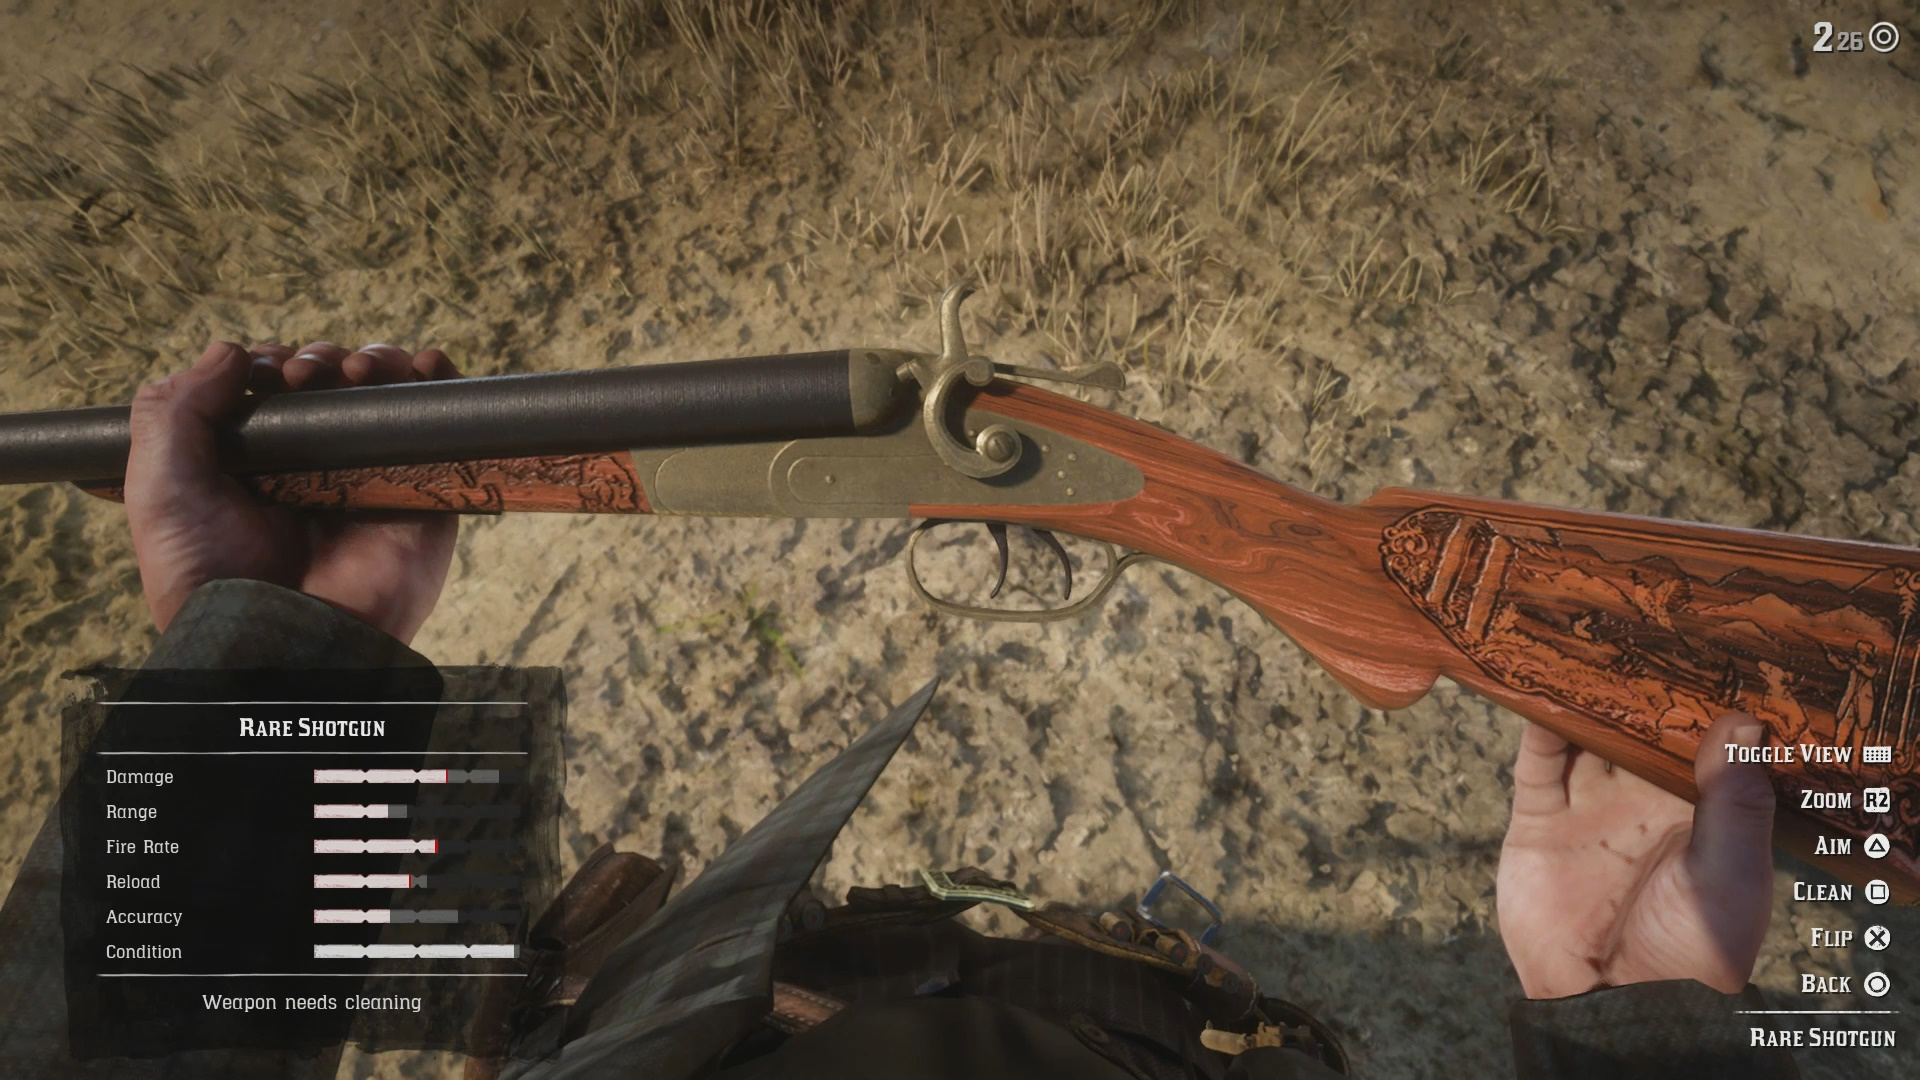
RDR2 has a number of rare and unique weapons that can only be obtained in specific ways — many of them permanently missable if you don’t grab them at the right time. These weapons often have pre-applied engravings and customizations that cannot be replicated at a Gunsmith. Here are the most important ones to know about.
Missable Weapons (get these before they’re gone)
| Weapon | Type | How to Get | Missable? |
|---|---|---|---|
| Midnight’s Pistol | Mauser Pistol (unique) | Loot from Billy Midnight after dueling him during The Noblest of Men, and a Woman stranger mission | Yes — must be looted from his body immediately |
| Flaco’s Revolver | Cattleman Revolver (unique) | Loot from Flaco Hernandez at Cairn Lodge during The Noblest of Men, and a Woman | Yes — must be looted from his body immediately |
| Granger’s Revolver | Cattleman Revolver (unique) | Loot from Emmet Granger near Flatneck Station during The Noblest of Men, and a Woman | Yes — must be looted from his body immediately |
| Calloway’s Revolver | Schofield Revolver (unique) | Awarded at the end of The Noblest of Men, and a Woman stranger mission chain | No — given automatically on completion |
| Rare Rolling Block Rifle | Rifle (unique) | Found on a bounty hunter in the barn near Braithwaite Manor during Chapter 3 mission Magicians For Sport | Yes — only available during that mission window |
| Rare Shotgun | Double-Barreled Shotgun (unique) | Obtained from a hermit living in a hut north of Annesburg in Roanoke Ridge | No — available any time after the area opens |
| Ornate Dagger | Melee | Looted from the Vampire in Saint Denis (found via graffiti clues around the city) | No — available any time |
Key Tip: All of the unique revolvers and pistols from The Noblest of Men, and a Woman must be manually looted from the bodies of the gunslingers you defeat. If you walk away without picking them up, they are gone permanently. Always stop and loot immediately after a duel.
11. Weapon Condition and Degradation
Every weapon in RDR2 has a condition rating that degrades over time through use and environmental exposure. Dirt, rain, mud, and heavy shooting all wear weapons down. As condition drops, you’ll notice reduced damage, slower fire rate, longer reload times, and occasional misfires.
The game notifies you when a weapon drops to poor condition, but performance starts declining before that point. You can check condition at any time by opening the Weapon Wheel (hold L1/LB) and hovering over a gun — the condition bar is shown beneath the weapon stats.
Cleaning weapons is technically optional, but leaving guns in poor condition during difficult fights is a real liability. Building the habit of cleaning after heavy use sessions is worth it.
12. How to Get and Use Gun Oil

Cost: ~$1.50 per bottle | Effect: Fully restores one weapon to perfect condition instantly
Gun Oil lets you clean a weapon anywhere in the world without visiting a Gunsmith. It’s cheap and widely available — there’s no reason not to keep several bottles stocked at all times.
Where to Buy Gun Oil
- Gunsmiths — under the Accessories section in the catalog. Available at all major town Gunsmiths.
- General Stores — most General Stores carry it in their provisions or accessories section.
- Looting — commonly found on enemy bodies, inside buildings, and in lockboxes while exploring.
How to Use Gun Oil
- Open the Weapon Wheel by holding L1 (PS) or LB (Xbox).
- Hover over the weapon you want to clean.
- Press R3 (click the right stick) to open the cleaning menu.
- Select Clean. One bottle will be consumed and the weapon fully restored.
Pro Tip: Keep at least three bottles of Gun Oil in your saddlebags at all times. At $1.50 each they’re practically free. The Valentine Gunsmith is the most convenient early-game source — stock up every time you pass through town.
13. How to Repair Weapons at a Gunsmith

When you’re in town and don’t want to use your Gun Oil stock, any Gunsmith can clean your weapons for a small fee. This is also a required step before customizing — a weapon must be in perfect condition before a Gunsmith will apply any upgrades.
Steps
- Find a Gunsmith (pistol icon on your map) and approach the counter.
- Press L2/LT to focus on the shopkeeper.
- Select Customize from the menu.
- Choose the weapon you want cleaned.
- Select Clean Weapon and pay the small fee.
14. How to Customize Your Weapons
Weapon customization is done exclusively at Gunsmiths. There are two upgrade categories: performance (improves stats) and cosmetic (changes appearance). Both are accessed through the Customize menu at any Gunsmith counter.
How to Access Customization
- Visit any Gunsmith and press L2/LT to focus on the shopkeeper.
- Select Customize.
- Choose a weapon from the list — all weapons stored on your horse are available here, even if not currently equipped.
- Browse the Performance and Cosmetic tabs and purchase upgrades.
Achievement: Fully upgrading all performance components on any single weapon unlocks the Locked and Loaded achievement/trophy. The Cattleman Revolver is a cheap early option to fully upgrade for this.
15. Performance and Cosmetic Upgrades Explained
Performance Upgrades
A gun’s performance upgrades are permanent and improve core weapon stats. They are worth prioritizing on the two or three weapons you use most frequently.
| Upgrade | Effect | Available On |
|---|---|---|
| Barrel | Improves accuracy and range | Rifles, Repeaters, Pistols |
| Stock | Improves stability and handling | Rifles, Repeaters, Shotguns |
| Sights | Improves aim speed and accuracy | Most weapons |
| Magazine / Cylinder | Improves reload speed and ammo capacity | Revolvers, Pistols, some Rifles |
| Grip | Improves handling and control | Pistols, Revolvers |
Cosmetic Upgrades
Cosmetic upgrades change how weapons look without affecting performance. Categories include Metals (finish and color of metal parts), Engravings (decorative patterns on metal), Carvings (patterns on wooden parts), Varnish (color of wooden components), and Leather Wrapping (color of grip or stock wraps).
Important: Unlike performance upgrades, cosmetic upgrades are not permanently tied to the weapon if it is lost or dropped. If you pick up a weapon from the ground, it will not have any cosmetics previously applied. Be cautious about heavy cosmetic spending on weapons you might swap out.
16. Weapon Maintenance Tips
- Always carry Gun Oil. Keep three or more bottles in your saddlebags. They’re cheap and you’ll regret not having them when you’re deep in the wilderness.
- Clean before you customize. A weapon must be in perfect condition before a Gunsmith will apply any upgrades. Save time by cleaning at the counter first.
- Loot bodies for Gun Oil. Enemies frequently carry Gun Oil. Thorough looting after combat means you’ll rarely need to buy it.
- High Honor = store discounts. Maintaining high Honor gives you up to 50% off at Gunsmiths and General Stores, which makes upgrading and stocking ammo significantly cheaper throughout the game.
Building a solid weapon loadout in RDR2 doesn’t require owning every gun in the game — it requires knowing which two or three weapons cover your bases, keeping them clean and upgraded, and using the right ammo for each situation. A fully upgraded Lancaster Repeater paired with a Schofield Revolver and a Bolt-Action Rifle will carry you through virtually every story mission the game throws at you.
Questions or comments about the weapons in Red Dead Redemption 2? Drop them in the comments below!